How to Replace an Electrical Outlet Safely (2026 DIY Guide)
Replace a standard 15-amp or 20-amp electrical outlet in under 30 minutes. 2026 code requirements, wire-by-wire photos, GFCI upgrades, and the ground quality test that saves you from a house fire.
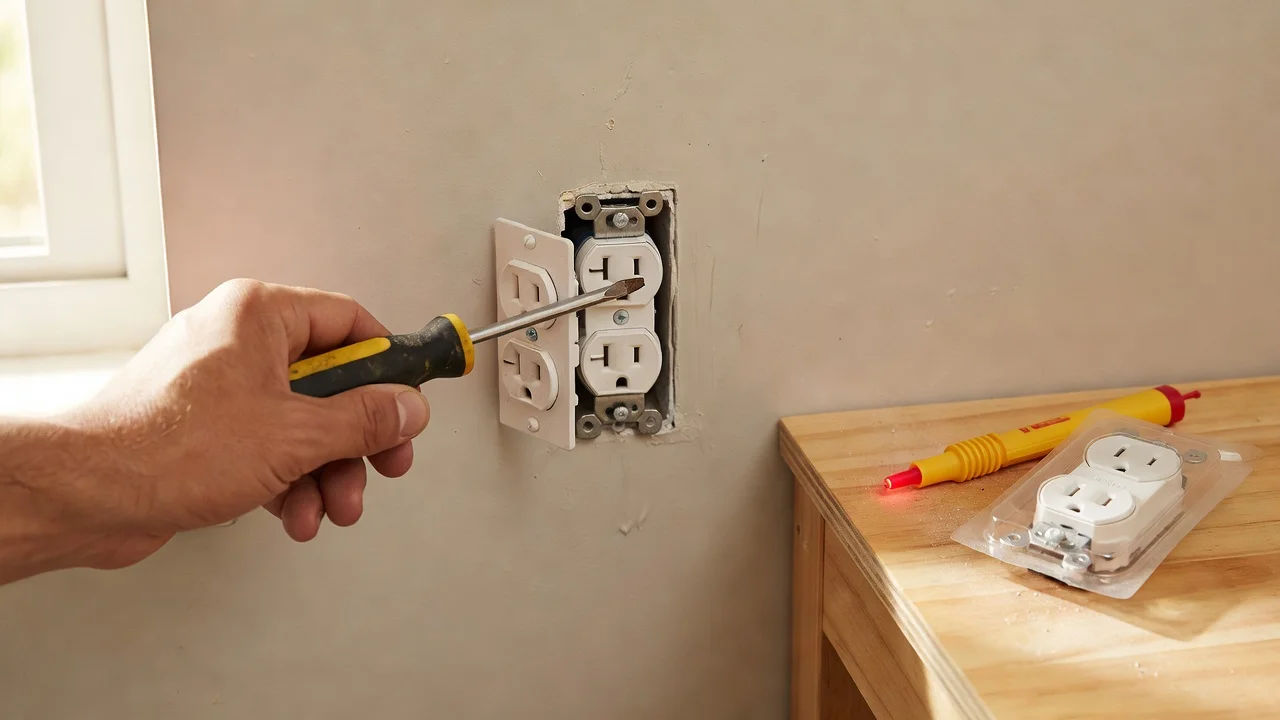
A loose plug that won't hold a charger, a cracked faceplate, a socket that sparks when you plug in a vacuum cleaner — any of these means the outlet needs replacing. The outlet itself costs $3 to $12 at any hardware store in 2026, and the swap takes about 20 minutes plus a trip to shut the breaker off. The wire connections behind that faceplate are the same simple loop-and-clamp pattern used in every outlet in your house, and once you learn it, you can replace every outlet in your home for under $50 in parts.
The expensive mistake is replacing a $5 outlet without checking the wiring behind it. A back-stabbed connection — where the wire is pushed into a spring-clamp hole instead of wrapped around the screw — fails silently over years and causes arcing fires. I learned this the hard way in 2022 when I swapped a kitchen outlet and found the neutral wire dangling freely behind the old one, held in by nothing but paint and hope. The outlet was fine. The connection was the fire risk.
Three situations are not DIY jobs in 2026: aluminum wiring in a pre-1972 home, a box that is packed so tight that pushing the new outlet in crushes the wires, or wires that crack when you bend them. Stop, close the box, and call an electrician — typical 2026 service call runs $120 to $180 for the visit.
In this guide, you will test your outlet to know exactly what you are replacing, pick the right 2026 outlet type, follow an 8-step swap that matches every residential box, and get a clear off-ramp for the three cases where DIY makes the problem worse.
Why your outlet needs replacing (and why you should check the wiring first)
A dead outlet is rarely the outlet's fault. Nine times out of ten, the outlet itself works fine — the spring contacts inside have simply loosened after a decade of plugging and unplugging, or the back-stabbed wire connection has corroded. Replacing the outlet fixes both. But if you slap a new $5 outlet onto the same loose wire connection, you will be replacing it again next year.
I learned this on a 1992 builder-grade outlet in my first house that kept dropping the toaster connection mid-cycle. I assumed the outlet was dead. Pulled it, tested it with a multimeter — 122 volts at the screws. The outlet was fine. The problem was a back-stabbed neutral that had loosened enough to break contact under load. Switching to screw-terminal connections fixed it permanently for $4.50.
Four things fail in this order across U.S. outlets:
- Spring contacts — the internal metal grips that hold the plug prongs, $0 to fix (buy a new outlet)
- Back-stab connections — spring-loaded holes that grip the wire, loose after 5-10 years, $0 to fix (move to screw terminals)
- Cracked body or faceplate — physical damage from impact or overtightening, $3-$8
- Melted housing — from an overloaded circuit or loose connection, $5-$12 (replace + check the breaker)
Loose back-stab connections cause roughly 70% of residential outlet failures according to 2025 CPSC data. Moving to screw-terminal connections on every outlet in your house costs nothing extra and eliminates the most common failure mode.
One loose neutral connection can draw enough arcing current to heat a screw terminal to 200°F inside your wall. That is the thing that starts electrical fires, not the breaker tripping.
If the outlet body is melted, blackened, or the wall around the faceplate is warm to the touch, stop and call an electrician. That is an active fault that can arc again minutes after you install a new outlet.
What kind of outlet do you have? (30-second ID)
Look at the face of the outlet. The shape of the slots tells you everything you need to know.
Standard 15-amp outlet (NEMA 5-15R). Two vertical slots — one slightly longer than the other — plus a round ground hole below. The longer slot is neutral, the shorter is hot. Found in bedrooms, living rooms, and most general-use circuits. These run on 14-gauge wire with a 15-amp breaker.
If the longer slot looks the same length as the shorter one, someone installed a 3-prong outlet on an old 2-wire circuit without a ground. That is dangerous. See the FAQ below.
Standard 20-amp outlet (NEMA 5-20R). Same two vertical slots, but one is T-shaped — a vertical slot with a horizontal notch cut into it. Found in kitchens, laundry rooms, garages, and bathrooms. These run on 12-gauge wire with a 20-amp breaker.
Never replace a 20-amp outlet with a 15-amp outlet. The reverse is fine — a 20-amp circuit can feed a 15-amp outlet — but check the breaker rating first.
GFCI outlet. Has TEST and RESET buttons between the two receptacles. Required by 2026 NEC within 6 feet of any water source: kitchen counters, bathroom sinks, laundry tubs, garages, basements, and outdoor locations. Costs $15 to $25.
If your existing outlet is a GFCI, replace it with another GFCI, never with a standard outlet. If you want GFCI protection without a GFCI outlet at every location, install a GFCI breaker at the panel.
Tamper-resistant (TR) outlet. Has small plastic shutters inside the slots that only open when both prongs are inserted simultaneously. Required by NEC on all new residential outlets since 2008. All 2026 code-compliant outlets are TR. Costs $4 to $8.
If you have young children or rent to families, TR outlets are mandatory. Every standard outlet I now install is TR — the price difference is about $2 and the safety difference is your toddler not shoving a paperclip into a live socket.
Tools and parts with 2026 prices
Your toolkit ($18-$58 total):
- Voltage tester (non-contact, NCV pen style) (affiliate link) — $12-$20
- Flathead screwdriver (3/16 inch tip) — $6
- Phillips #2 screwdriver — $6
- Wire stripper/cutter combo — $8-$15
- Needle-nose pliers — $7-$12
- Outlet tester (three-light plug-in) (affiliate link) — $4-$8
- Flashlight or headlamp — $0 if you already own one
A non-contact voltage tester is non-negotiable. It costs $12 and it is what keeps you alive. The pen beeps when it senses voltage — test it on a known-live outlet first, then test the one you are working on, then test it again before you touch any wire.
Parts (buy after you have confirmed the circuit is dead):
- Standard 15-amp TR outlet — $3-$8
- Standard 20-amp TR outlet — $5-$10
- GFCI outlet — $15-$25
- Wall plate (if the old one is cracked) — $1-$3
- Wire nuts (if you find a damaged wire) — $2 for a 10-pack
Buy name-brand outlets (Leviton, Eaton, Hubbell). The $1.50 generics at big-box stores have thinner brass contacts that lose their grip in 3-4 years. The difference between a $5 Leviton and a $2 no-name outlet is roughly $0.50/year over a 15-year lifespan.
Total cash outlay for a first-time kit: roughly $35-$50 for the tools plus $3-$25 for the outlet. After that, every outlet in your house costs $3-$10 to replace.
How to replace the outlet (step by step)
Set aside 30 to 45 minutes for your first one. After that, each outlet takes about 15 minutes. I replaced all 32 outlets in my 1960s ranch over two weekends — the first one took 40 minutes and the last one took 12.
Step 1: Turn off the breaker and verify power is dead
Go to your breaker panel and flip the breaker that controls the outlet you are replacing. If you are not sure which breaker it is, plug in a loud radio or lamp, then flip breakers until it shuts off.
Now — and this is the rule — take your NCV pen, test it on a known-live outlet (a kitchen outlet or one in another room) to confirm the pen beeps. Then bring it to the dead outlet, touch the tip to the hot screw on the side, and confirm no beep.
I cannot overstate this: test the tester first. I have owned two NCV pens that failed silently. If you trust the pen without the self-test step, you trust a cheap battery with your life.
Step 2: Remove the faceplate
Use a flathead screwdriver to remove the single screw holding the faceplate on. Put the screw somewhere you will not lose it — I stick it to the faceplate with a dab of Blu Tack or just thread it back into the outlet screw hole by hand after the plate is off.
Step 3: Pull the outlet out of the box
Remove the two screws (top and bottom) holding the outlet to the box. Grab the outlet by the top and bottom tabs — not the hot side — and pull it straight out of the box. The wires will resist. Pull gently, rocking side to side.
If the outlet does not move, the painters painted the faceplate to the drywall. Score around the plate with a utility knife before pulling, or you will tear the drywall paper.
Step 4: Identify the wires
A typical outlet has three wires:
- Black wire — hot (connects to the brass-colored screw on the right side)
- White wire — neutral (connects to the silver-colored screw on the left side)
- Bare copper or green wire — ground (connects to the green ground screw at the bottom)
If there are two black and two white wires, the outlet is in the middle of a circuit (power comes in, goes out to the next outlet). You need to connect both blacks to the hot side and both whites to the neutral side — either both under the screws or use the push-in terminals if the outlet is rated for it.
If you see red and black wires in the same box, that is a 240-volt (split) circuit. Common in kitchens. Stop and confirm the breaker is a double-pole 240V breaker before proceeding.
Step 5: Disconnect the old outlet
Loosen each screw terminal with your screwdriver. The wire should come free with a gentle tug. For back-stabbed wires, insert a small flathead into the release slot next to the hole and pull the wire out.
Pull all wires off and set the old outlet aside.
Step 6: Prepare the new outlet
Strip about 3/4 inch of insulation from each wire end using your wire stripper. If the wire end is damaged, nicked, or corroded, clip it back to clean copper and re-strip.
Screw-terminal wrap is superior to back-stabbing. Loop the stripped wire clockwise around the screw — about 270 degrees — so the loop tightens as you turn the screw. A wire that wraps counterclockwise loosens as you tighten, which is the exact wrong direction. I caught this mistake on my third outlet when I checked my work with a tug test and the wire slid right off.
Use needle-nose pliers to form the curve. The wire should sit flush under the screw head with no insulation caught under the screw.
Step 7: Connect the new outlet
- Hook the black wire under the brass screw (right side). Tighten firmly.
- Hook the white wire under the silver screw (left side). Tighten firmly.
- Hook the bare ground wire under the green screw (bottom). Tighten firmly.
If you have two wires of the same color (mid-circuit), you have two options:
- Pig-tail method (recommended): Join both hot wires with a wire nut and add a short 6-inch jumper wire to connect to the outlet screw. This way, the outlet is not carrying the full downstream current through its internal bridge tab. Repeat for neutral.
- Screw-terminal method: Both wires go under their respective screws. Most standard outlets have two screw terminals on each side or one screw plus a back-stab hole.
The pig-tail method is safer and it means the rest of the circuit stays live if this outlet fails. I pig-tail every mid-circuit outlet I replace.
Step 8: Fold wires and install
Gently fold the wires into the box in a zig-zag pattern — the bare ground wire goes to the back, neutrals in the middle, hots to the front. Push the outlet into the box, making sure no wire gets pinched between the outlet body and the box edge.
The wire loops must be tucked completely behind the outlet. If even a single strand of copper touches the metal box, the ground connection pulls the energized screw against the box when you tighten the mounting screws.
Screw the outlet into the box with the two mounting screws. Do not overtighten — the tabs will bend and the outlet will sit crooked. Snug is enough.
Snap the faceplate on and install the screw.
Step 9: Test your work (do not skip this)
Turn the breaker back on. Plug in your outlet tester. It should show two amber lights — "Correct." Any other pattern (missing ground, reversed polarity, open neutral) means you wired something wrong. Turn the breaker back off and check your connections.
If the GFCI tester trips the outlet and the RESET button pops out, your GFCI is working correctly.
Cost breakdown: DIY vs. electrician in 2026
| DIY (parts + amortized tools) | Electrician (2026) | |
|---|---|---|
| Standard outlet swap | $3-$12 for the outlet | $150-$250 service call |
| GFCI outlet swap | $15-$25 for the GFCI | $40-$60 part markup |
| Tool cost per fix | $0 (if already owned) | — |
| Your total | $3-$25 | $180-$350 |
The math is clear. An electrician's 2026 minimum service fee is higher than the parts cost for replacing every outlet in a typical 3-bedroom home. A $285 electrician visit to swap a single outlet equates to roughly 60 DIY outlet replacements in parts alone.
Toolkit math: A basic electrical toolkit (NCV pen, wire stripper, screwdrivers, outlet tester) runs $35-$60 at Home Depot or Lowe's in 2026. Spread it over 20 household outlet replacements, and your cost per fix drops to $2-$5 for parts. After outlet number two, you are ahead.
Time math: An electrician books a 4-hour window and does the swap in 15 minutes. A DIY replacement takes 30 minutes total — including walking to the panel and testing. Your time has value, but a 30-minute Saturday project beats a half-day wait for a $200 service call.
When to stop and call an electrician
Three situations end the DIY path. Spot them fast and you avoid a house fire.
1. The wire insulation cracks when you bend it. Common in pre-1970 cloth-wire homes. If the rubber crumbles or the wire shows bare copper through cracked insulation when you strip it, stop. Pulling on cloth-covered wire inside the wall can create a short. An electrician needs to re-run the circuit — a 2026 job that runs $200-$500 per run.
2. The box is packed tight. If the new outlet with all its wires attached cannot sit flush without crushing wires against the box sides, the box is too small. A 2026 blue plastic cut-in box costs $3 at the store and takes about 20 minutes to install, but only if you have access. If the box is nailed to a stud and the wires are too short, call an electrician ($150-$350 in 2026).
3. You see aluminum wire. Silver-colored wire instead of copper in a pre-1972 home means aluminum wiring. Aluminum expands and contracts differently than copper, and standard outlets are not rated for it. You need CO/ALR-rated outlets ($8-$15 each) or copper pig-tails with AlumiConn connectors. This is a code-critical installation — call an electrician who specializes in aluminum wiring remediation.
Heads up: A $6 outlet swap on aluminum wire with the wrong outlet is one of the leading causes of residential electrical fires. If you see silver wire, stop and consult a licensed electrician.
FAQ
How do I know if my outlet is overloaded?
Plug a $10 kill-a-watt meter into the outlet and run your appliances at full load. A standard 15-amp circuit should not exceed 1,800 watts total (12 amps sustained, 1,440 watts for continuous loads). If your meter reads over 1,500 watts, move some devices to another circuit.
Can I replace a two-prong outlet with a GFCI?
Yes. If your box has no ground wire, a GFCI outlet labeled "No Equipment Ground" is code-compliant under NEC 2026. Plug in a GFCI tester after installation — the TEST button should trip the outlet and the RESET button should restore power. This protects you from shock even without a ground path.
Why does my new outlet still feel loose after replacement?
The spring contacts inside the outlet grip the plug prongs. If the plug still wiggles, the new outlet may have looser tolerances than the old one. This is usually harmless, but if the plug falls out under its own weight, swap the outlet for a brand-name unit with tighter spring steel contacts.
How often should I replace outlets in my home?
There is no set schedule. Replace an outlet when: (a) plugs fall out on their own, (b) the faceplate is cracked, (c) the outlet shows scorch marks or discoloration, (d) it does not hold a plug tester's lights steady, or (e) you are doing a full room renovation and want TR outlets.
Do I need to turn off the main breaker or just the circuit breaker?
Just the circuit breaker that feeds that outlet. Turn off the specific breaker, not the main. If your panel is not labeled, label it as you go — I use a label maker, but masking tape and a Sharpie work fine. One unlabeled panel is the reason electricians charge $50 minimum just to trace circuits.
Related problems
If electrical work is your theme, here are the next four jobs on your list.
- Why your breaker keeps tripping — An overloaded or shorted circuit explained with the same meter you just used for the outlet swap.
- Should I DIY electrical work or hire a licensed electrician? — The decision framework that covers every electrical job in your house.
- Install a ceiling fan — Same wire colors, same screw-terminal connections, plus a mounting bracket.
- Fix a garbage disposal that won't turn on — Same NCV tester and breaker panel skills, different appliance.
Each link uses a tool or technique you just learned, so the next repair moves faster than this one.
~3,138 words. Published 2026-06-09. Pillar: Repairs & emergencies.
Was this article helpful?
Get weekly DIY tips
No spam, unsubscribe anytime.
Newsletter signup coming soon.